You can buy furniture safety strap kits for about $10 a kit which will secure one bookshelf. If you need to secure many bookshelves buying one kit per bookshelf becomes expensive. Here's how to make your own furniture safety straps and save money. With the process described below I spent about $50 and was able to secure 16 bookshelves with materials left over.
Buying Materials
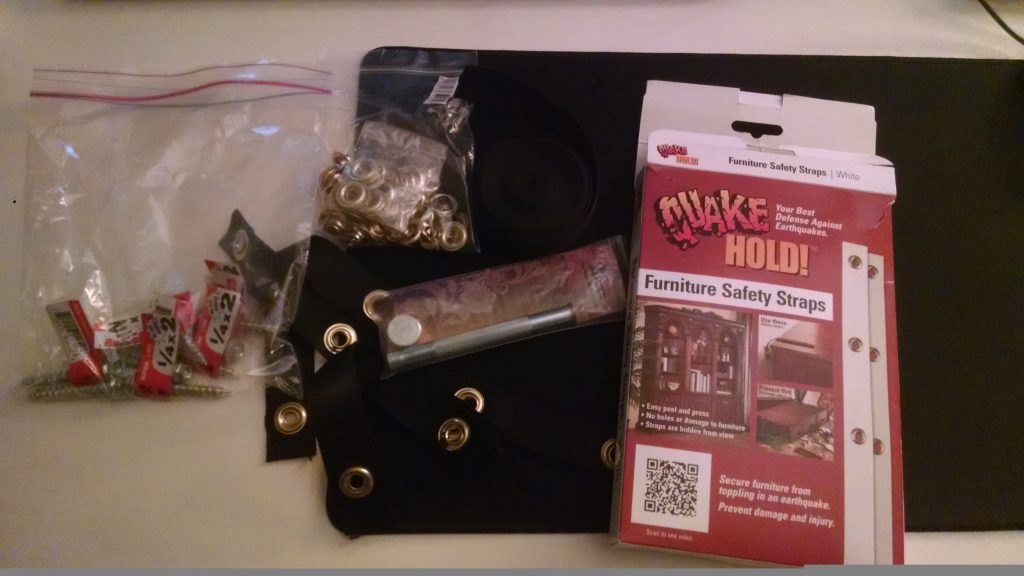
- Nylon webbing : Search ebay for
Black 10 Yards Nylon Heavy Webbing Strap 1 inch. This should return a number of sellers that will ship direct from China. I got mine for $6.50 with free shipping. Look for a cheap and trustworthy Chinese seller. The requirements are that the webbing be 1 inch wide or greater and that it's a long enough roll to produce the number of straps that you need. Each strap is about 9" long, each bookshelf takes 2 straps so 10 yards will make straps for 20 bookshelves. - Grommets : Search ebay for
#1 Grommets Solid Brass 5/16" 100 Pack. I got mine from a seller that doesn't appear to carry these anymore for $10.99 with free shipping. Specifically I got Tandy Leather brand grommets product number 1285-11. The requirements are that the grommets are #1 5/16" grommets, where 5/16" is the inner diameter and that it be a pack of enough grommets to do the number of bookshelves that you need. Each strap uses 3 grommets, each bookshelf uses 2 straps for a total of 6 grommets per bookshelf. A pack of 100 grommets will do 16 bookshelves. - Grommet setter with anvil : You'll need a grommet setter to attach the grommets to the nylon webbing. I got a 5/16" Tandy Leather brand grommet setter product number 8097-03. I got this setter on ebay for $11.99 plus $2.13 shipping from ebay gwaynecraft2009 and you can see his listing for this with this advanced search. The only requirement of this setter is that it be designed for 5/16" #1 grommets.
- Lag bolts : You'll need one lag bolt for each strap or 2 lag bolts for each bookshelf. The lag bolts you'll need are 1/4" x 2" full thread lag bolts, ideally with a hex head, ideally 3/8" hex head. I used Spax Powerlags 1/4 x 2" which I bought at Home Depot. You might be able to get away with a non-full-thread lag bolt if needed and you could go with 2.5" long if needed. Looking online I should have ordered a box of lag bolts instead of buying them quantity 1 at Home Depot. Go to ebay and search for
1/4" x 2" lag bolt 50and it looks like you can get a box of 50 for $10. You can also get lag bolts with washers which I didn't do but might be beneficial. 50 lag bolts will do 25 bookshelves. - Modified Truss Screw : The modified truss screw is what attaches the strap to the bookshelf. It's a truss screw so that the had is large enough to cover the grommet opening. I used
#8 x 3/4" Zinc #2 Phillips Modified Truss Screw. The screw size is #8 with a thread count of 15 or 18 (#8-15 or #8-18). The length of the screw is 3/4" but this should be based on the thickness of the tops of your bookshelves so that the screw doesn't penetrate all the way through but comes as close as possible. For me 3/4" was a good length. The "#2 Phillips" is the size of phillips head that fits with the screw. You need 2 screws per strap and 2 straps per bookshelf for 4 screws per bookshelf. You can get a 100 pack for about $10 on ebay. Search ebay formodified truss #8 x 3/4"
Creating Straps
- From the spool of nylon webbing cut enough straps for your bookshelves. Cut each strap to be about 9" long. The straps that come in the commercial packages are 15" long but I find you don't need that much length. If your bookshelves sit far from the wall or there is thick molding keeping them away from the wall you might need longer than 9". In all of my cases 9" was perfect.
- Take one of the straps and identify 3 points on the 9" strap. One about an inch away from one end, one an inch away from the other end and one in the middle. At each of these 3 points, take a razor blade and cut/puncture a small x in the strap. The x should be in the center of the 1" strap width. The lines of the x should be about 5/16".
- Take the male part of the grommet and push it through the first x you've cut. If it doesn't fit, cut the x lines longer so it will fit. Once it's pushed through use your razor blade to cut around the outside of the barrel of the male grommet piece to get rid of some of the nylon webbing material. It will come off as black fuzz. Once you've removed enough nylon webbing so you can see most of the barrel of the male grommet piece use the grommet setter and a female grommet piece and a hammer to set the grommet in the nylon webbing. If you've not cut away enough nylon webbing you'll see some of it sticking out of the grommet (which isn't the end of the world). If you've cut away too much nylon webbing the grommet won't be secure in the nylon webbing and may come loose. Repeat this for all 3 x holes.
- Repeat steps 2 and 3 until you have enough straps
Installing The Straps
- With the bookshelf against the wall mark where the top of the bookshelf comes to on the wall
- Move the bookshelf away from the wall
- Using a studfinder find studs that line up somewhere behind the bookshelf, you'll need to find 2
- Make two marks on the wall for each stud that you found and make them an inch or two below where the top of the bookshelf came to on the wall.
- Drill a pilot hole in the two marks with a 3/16" drill bit of about 2" in length
- Place one of the straps on the wall so that the grommet hole on one end of the strap is centered over the pilot hole. Using a 3/8" hex bit in your drill or electric screwdriver, and one of the 1/4" x 2" lag bolts, attach the strap to the wall with the lag bolt. As you get near to sinking the lag bolt flush against the strap and wall, turn the strap so instead of hanging down below where you're screwing the bolt in, it's sticking straight up above the lag bolt. Finish securing the lag bolt to the wall. Do the same for the other pilot hole. You now have two straps attached to studs with lag bolts drooping down over your lag bolts.
- Move the bookshelf back into place. As you do this either with your hand or a ruler or something, flip the drooping strap up so that it rests on top of the bookshelf.
- Get up on a stool or chair so you can get to the top of the bookshelf. You should see the two straps laying on top of the bookshelf. Ensure the bookshelf is in the correct lateral (side to side) position against the wall and that it is the correct distance from the wall that you want. Take the first strap and with it taught against the top of the bookshelf, using a #2 phillips bit and a screwdriver or drill, drill a modified truss screw through one of the two grommets visible on the strap on top of the bookshelf. Do the same thing with the second grommet. Repeat this with the second strap's two grommets.
- Test your work by pulling on the bookshelf to see how much play it has, if it twists side to side at all when you pull it and how much force it can stand.